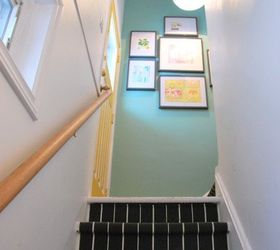
Remember back when I gave a little makeover to our side entryway? We painted the walls and door, added a thrifted light fixture, and some artwork. It made it way more attractive. Well, it was time to do something about the stairs. Enter: a DIY stair runner using IKEA rugs!
Here is the space to help jog your memory:This is the main part of the staircase where our tenant walks up and down everyday. It had some cheap carpet thrown down as a runner,. And the second part of the staircase, leading up to the main floor, had nada.
 I knew I wanted a new runner on there - one that was darker in colour so it would help hide the dirt (tenant walks up + down in outdoor shoes), but that still had a bit of style. I went to IKEA to see what they had, and came across the "soften" rug. It's a small, flatwoven rug that happened to have the perfect width for our stairs. At $25 a pop, it wasn't a super cheap option, but I couldn't find anything else that was in the right colour scheme or size. We had measured out our staircase before coming, and so calculated that we would need 5 of them to do the job.
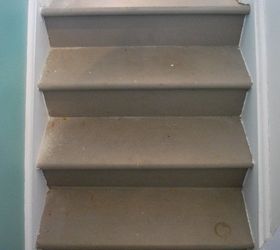 Before getting started I did a bit of googling around to see what others had done when they DIY'ed a stair runner. And you'll never guess what I ended up stumbling on? Jenny, from Little Green Notebook, and who has amaaaazing style, had done this exact project using the IKEA Soften rugs! Clearly we were on the same brainwave. And the best part? I was able to follow along with her tutorial.
The first step was to rip up the existing runner, and then give the stairs a coat of paint. I went for a high gloss white that would be super durable, and only had to paint the side of the treads and risers.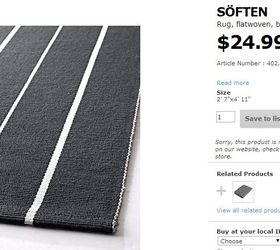 Then it was time to break out the rugs, some scissors, a ruler, and my staple gun. I lined up the rug at the top of the stairs and measured out the space on either side to ensure it was even. Once I knew that number, I went and made little marks on both sides of each step, as a guideline to follow when my rug got to that step. Then it was just a matter of stapling the rug down. I can't actually remember what size of staples I used, but Jenny used 3/4 brads.
 I started by stapling under the lip of the top stair, and then pulling the rug tightly down the riser, and staple it along the bottom. Then again pull the rug over the tread of the stair, back down under the lip, and staple along again. I would start with say 4 staples under the lip to get the rug in place, and then add another bunch of staples to ensure it was secured really well. I found that the staples were best placed near each white stripe (I would try to get it at the border between the white and the grey), and would staple vertically - in line with the stripe. In the pic below you can see a few of the staples right under the lip of the top tread, and then there are some again at the bottom of the riser.
 When I came to the end of a rug and it was time to staple down a new one, I would cut the previous rug right underneath the lip of the tread, and then staple the new one overtop, matching the stripes as well as I could. Again, check out Jenny's tutorial as she gives good step-by-step pics.
Once everything was stapled down, it looked great but I wanted to add some upholstery nails down the sides for both style and extra security of runner to stair. I grabbed some gold ones from Home Depot, which were a couple of bucks for a package.
I played around with the placement and decided on 6 nails per tread. I would eyeball them and lay them face up on the tread (lazy DIY'ing, and didn't measure each one exactly), and then hammer 'em in. Head over to the blog to see more steps and info on my DIY STAIR RUNNER USING IKEA RUGS.
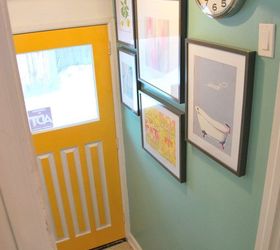
And here is that entryway nook now. SO much better.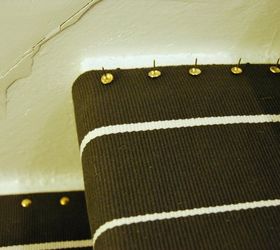
 Full cost was around the $150 mark - not super cheap, but really pretty reasonable compared to custom runners. I would definitely do this project again if we had any other staircases to do.
Do you guys have stairs in your home? Do they have runners or are they left bare? I love a good chunky wood stair with white riser. That's what I'm hoping for in our future house. But I do really like a runner too - they add that element of softness and can definitely bring in some fun pattern and colour. Plus you don't fall on them as easily. I have been known to come crashing down a staircase or two.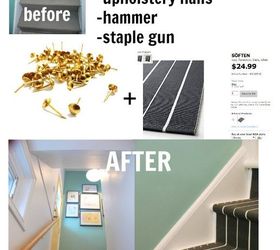
Original article and pictures take http://www.hometalk.com/10019397/a-diy-stair-runner-using-ikea-rugs site
Комментариев нет:
Отправить комментарий