The boring vinyl siding on our 1928 beach cottage had been leaving me feeling blah for years. This weekend we added these cute DIY shutters to help break of the monotony of the front of our home.Here's how our cottage beach house looked when we bought it. The vinyl siding (added by prior owners) is obviously not original, and I'd love to restore it to its former glory (cedar shingles!) at some point, but for now, re-siding the house isn't in the budget. In the meantime, these charming shutters framing the top window give it a more authentically-beachy-feel. For two 12"x48" shutters, you'll need just two lengths of 1"x6"x8' common board wood ($9/board), plus a shorter piece at 6' (to cut and place across the top and bottom of each shutter to hold it together and complete the look--about $7). Some finishing nails and sandpaper completed my purchase, so everything for two full shutters was about $36!
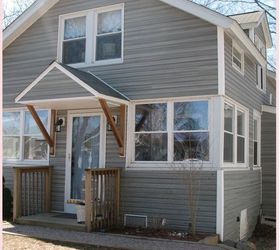 --Gather your tools and then cut each of the 8' common board pieces in half using a hand saw or circular saw. I cut mine at Home Depot to make them easier to transport home in the car. Lay the boards together with a slight gap between them to get a feel for the size. Although the boards are rated at 6" wide, they are likely a little narrower than that measurement, and it is helpful to get a feel for what the finished shutter size will look like.
--With your boards together, measure down 3" from the top - this is where you will align the small piece of wood that will hold the top of the shutters. Repeat the same for the bottom (i.e., measure up from the bottom 3"). I like to use a chalk line to mark a straight line for my measurements, but you can also measure in a few different places and draw your own guidelines. Measure the width of the 2 boards together, small gap included. Note that it is important to measure the widths at the top and bottom of your shutters since there is likely variability in your wood widths.
--Using the measurements from step 5, use a handsaw or circular saw to cut your smaller piece of wood (the 6' piece), to create the top and bottom of your shutters. You should end up with two short pieces (between 11"-12" long and 6" wide) that you can lay across your shutters, at your markings 3" from the top and bottom. IMPORTANT - DO NOT SECURE THESE PIECES NOW.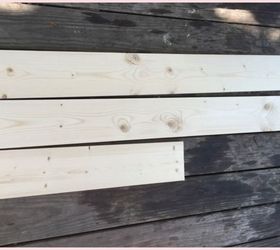 --With the pieces in place, get a feel for where you would like the cut your shape, and then trace your image.
--Once the image is traced, separate the boards and carefully cut he shape out using a jigsaw, bandsaw, or other tool you have in your arsenal. After you are done cutting and removing the excess wood, sand them to a finish. I used course and medium sandpaper, as well as a sanding sponge, to get that job done.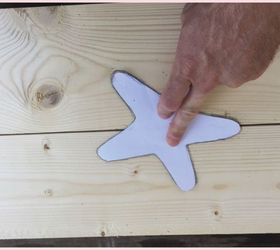 Once the image is traced, separate the boards and carefully cut he shape out using a jigsaw, bandsaw, or other tool you have in your arsenal. After you are done cutting and removing the excess wood, sand them to a finish. I used course and medium sandpaper, as well as a sanding sponge, to get that job done.
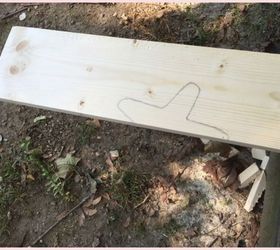 Align the boards back together and secure the top and bottom pieces you cut and placed previously 3" from the top and bottom. The shutter should now be secure.
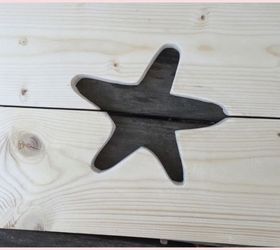 Repeat for the second shutter - and here is a hint - once you cut the two main boards for the second shutter, all you need to do is place your first shutter on top of the two pieces and trace your shape - this will make sure it is aligned similarly.
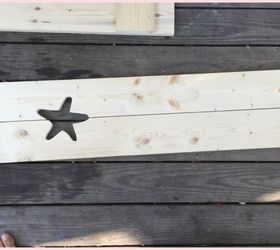 The last step is to finish with paint or stain (my favorite part!). We used a subtle pink to match the same color as our front door.
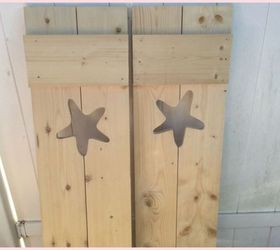 Hang them using shutter screws (these are fixed, not functional!), and see your curb appeal instantly rise!
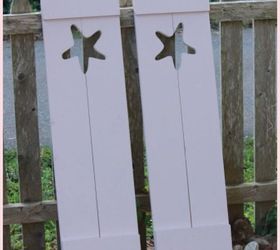 We used a subtle pink color (to match our door), and I love how it pops against the grey.
 I'm psyched that for less than $40 we were able to add a huge amount of charm to the front of our house.
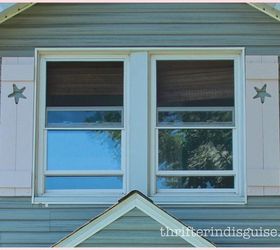 Lots more details on the blog!
Original article and pictures take http://www.hometalk.com/10003962/diy-cape-cod-style-starfish-shutters site
Комментариев нет:
Отправить комментарий