Is it bringing you down?
Well I have your solution!
Paint your Refrigerator with Velvet Finishes
http://www.velvetfinishes.com
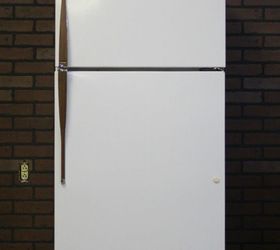
How I will never know, she was by herself.
She thought it would be great in her garage for extra food and drinks. But the poor thing was old and ugly.
Too ugly for even a garage, which is why it ended up at the studio.
She knew I would paint it...
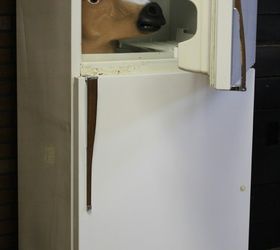
All that white, I simply saw a giant blank canvas.

I almost wet myself.
Of course, they are laughing their heads off and high-fiving each other.
After I gathered my thoughts, I was ready with my loose plan.
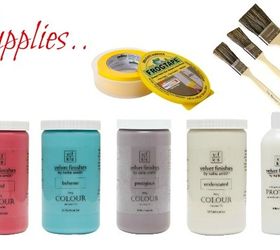
The supplies I used were as follows:
Velvet Finishes Vivid / Boheme / Prestigious / Understated paint
Velvet Finishes Reviver Paint brushes and Velvet Finishes Protect
Frog Tape for Delicate surfaces
http://velvetfinishes.com/shop.html
http://frogtape.com/products/frogtape-delicate-surface
The material of this refrigerator was smooth and slick, rather than the orange peel of some of the newer models. I did a test spot for adherence and the paint grabbed really well so I did not prime. I recommend you test any slick surface before you paint an entire piece. Even though Velvet Finishes has a wonderful grip, it is not always going to stick to every surface every time.
If you feel it is iffy, then take the time to use an appropriate primer for latex based paint.
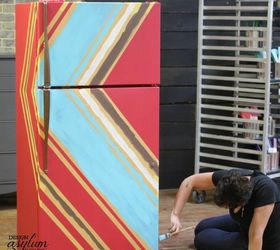
Once the base coat was complete, we were ready to begin taping for our stripes!
We used the Frog Tape for Delicate Surfaces because we were painting over a newly painted surface.
My plan was very loose, but I knew I wanted angled stripes and I knew I wanted to continue across the sides and over the top.
Here's how we did it:
We used a 45/90 degree angle that I had from my days of drafting class. You can use anything that has angle, you could cut if from a cereal box, it just helps to keep you on the same angle degree, especially since we were turning the angles back.

TIP: When you reach the sides of the refrigerator, be sure to have enough tape pulled off to wrap around the side a few inches. In other words, do not start at the edge with the tape and do not end exactly on the edge. Pull a couple of inches of tape and begin your edge with a few inches left so that you can wrap the edge across the door gap, and end with a few extra inches to wrap.
If you do this, when you press the tape to the side and if you keep the tape straight and do not pull it out of shape, you will have perfectly started your new angles on the sides. From those short pieces you can begin making your marks, add new pieces to the side by slightly covering the tail from the other piece of tape.
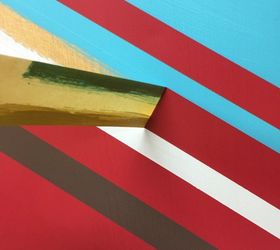
You can see this in the photo below.


It's important to pull the tape while the final coat of paint is still slightly wet.
I am telling you, Frog Tape is completely amazing.
I love the way we went around the sides and over the top with the stripes. I think this old sad fridge looks amazing now! It will definitely energize the garage at my friend's house!

Original article and pictures take http://www.hometalk.com/10000205/diy-paint-your-refrigerator site
Комментариев нет:
Отправить комментарий