So with the weather still snowy and cold over the weekend, and no ability to work on the chicken coop or recycled greenhouse project - it was time to cure the winter blahs with a building project! And yes, sadly, as the garage became a temporary workshop, Mary's vehicle was once again the victim and banished to the driveway :).
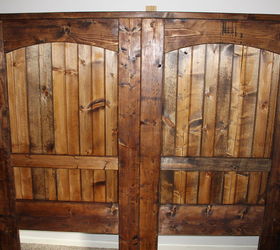
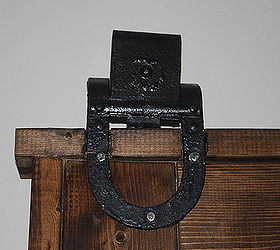
The headboard can be made with a variety of materials. If you want a rustic look - you could easily use pallet boards and old barn wood to create it completely from recycled materials. It can also be built from simple framing lumber. Ours is a combination of both, along with some salvaged barn hardware saved when we deconstructed two old barns.
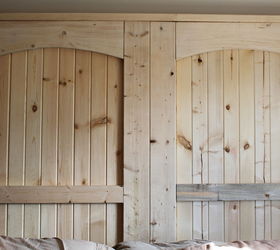
Since this was built for a king sized bed - we built it as two separate door frames and then attached them together once in the bedroom. It made it easier to move and work with, not to mention fit through tight hallways! When finished - it measured 6' high x 83" wide.
Here are the basics on how we made ours:
Door Materials:
(4) 2 x 6 x 72"
(3) 2 x 4 x 80"
(4) 2 x 10 x 29"
(2) 2 x 4 x 29"
(12 to 16 pieces) of 3/4" or 1" thick, 48" long boards
Tongue and groove wood, old barn siding or pallet wood would work great for this, we used some 3/4" x 8" wide tongue and groove boards we bought at the lumber yard for around $40.
Trim Boards:
(2) 2 x 4 x 72"
(1) 2 x 4 x 85"
Tools Used:
Tape Measure, Circular or Chop Saw, Drill, JigSaw, Nail gun, (30) 2 1/2" screws, Biscuit Joiner (overkill)
Step 1 - Cut Materials
We started by cutting all the materials to length - using a mixture of scrap lumber and purchased wood from the local lumber yard. Scrap wood is actually a great choice, even if it is nicked up - adding a rustic feel to the finished piece.
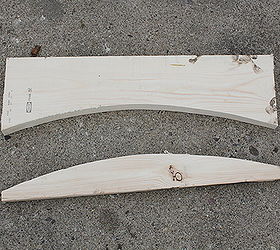
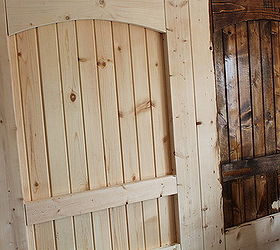
Step 2 - Making The Top Curved Boards
Taking the two 29" 2 x 10" pieces - we traced a long curved line on one and cut it out with the jigsaw. We traced the cutout to the second board to match, and made our second cut.
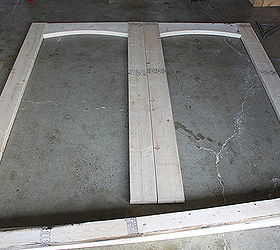
Step 3 - Laying Out The Doors:
Next, we assembled the two doors - one at a time. We built the doors face down, assembling it from the back.
We started with (2) 2 x 6" x 6' rail pieces. We then laid (2) 29" pieces between the 2 x 6" side rails for the doors. We put the curved board at top, flush with the top of the 2x6's. We placed the other 29" board 24" from the bottom of the door , and the remaining 2x4x29" board 42" from the bottom.
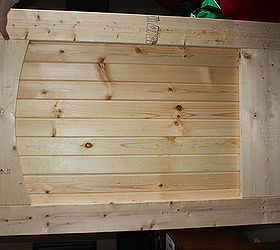
Step 4 - Gluing the Frame:
I applied glue to all of the joints and clamped them together while nailing on the backing boards. I did take an extra step and added simple biscuits to the joints for added strength - It's a habit of "overbuilding" that I tend to have :). Simply applying glue to the joints and clamping would have been enough, especially with the backing boards and 2 x 4" braces we attach later.
Step 4 Assembling the Door
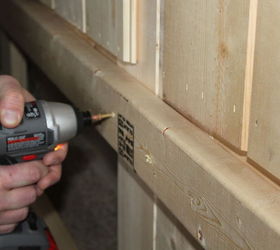
Using a 2 x 4 as a guide on the outer edge of the back of the door frame - and with a nail gun, we nailed in all of the 48" tongue and groove boards across the door opening - nailing on the top and bottom, and to the 29" 2 x 4"piece as well. You could use pallets or reclaimed boards here just as easily. By nailing in to the door frame boards, the door becomes one solid piece. Once done, we repeated the process and built door #2.
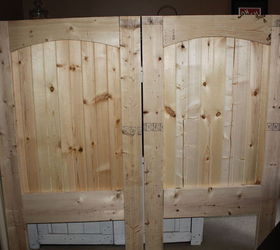
Step 5 - Assembling The Headboard:
We took both doors to their permanent location before assembling into the final headboard. Placing both doors side-by-side with the fronts facing the wall - we screwed in the top 2 x4 x80" piece to connect the two doors. Then we installed the remaining two 80" boards - one at the very bottom and one at the bottom of the 2 x 10 x 29" board located below the tongue and groove boards.
Step 6 - Trim and Hardware:
Next, we flipped it around, and added a couple of 2 x 4" trim boards on each side as well as the top to trim it out and give a little depth. All that was left was to stain, and add the old barn hardware. We finished it off with a couple of old lanterns, and the headboard was complete!
From start to finish - the entire project took about 4 hours. Well, 4 1/2 if you count cleaning the garage back up :)
If you would like to receive our weekly DIY and Gardening Posts – be sure to sign up to follow our blog via email, Twitter or Facebook in the right hand column
- Jim and Mary


Original article and pictures take http://www.hometalk.com/1025477/how-to-build-a-rustic-barn-door-headboard site
Комментариев нет:
Отправить комментарий