Painting faux brick walls is easy!
Brick walls, brick floors, brick ceilings. Any and all of them. Brick can really give a space a unique and textured look, whether left natural or painted.
I decided to add a brick wall section in the design studio for photographing furniture and I wanted it to look old. I wanted character and layers of time.
I purchased faux brick sheets from Lowe's. They come in 4 x 8 sheets and run around $27/sheet. Not bad. The space I wanted to have the brick is only about 6 wide so we needed 2 sheets.
STEP 1: INSTALL THE SHEETS
The Accomplice installed the first sheet and then determined how wide the second piece would have to be. It was easy to cut with a table saw. When using cut pieces, be sure you are butting the sides together that make the complete brick pattern, rather than having the pattern mismatched at a seam.

By using an oscillating multi tool. Cutting the brick sheet was simple as The Accomplice measured where the electrical outlets were before he hung the sheets so he knew exactly where to cut. Be sure to kill the power to any electrical boxes you are cutting through to, we don't want any injuries out there!!!

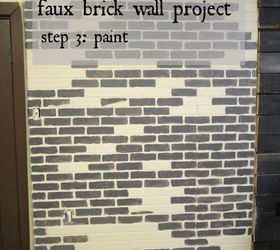
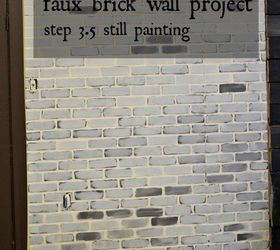
We began by painting the base coat of Velvet Finishes Soulful. We used this to cover the entire wall.
Next, I covered most of the bricks with Timeless. I wasn't extra careful - remember I'm a little lazy - to not paint the 'grout lines' of the wall, but I did try to avoid that. I wanted the grout to be the beige. Since this is supposed to look old, don't worry about having perfect lines or an even coat. I used the Reviver 1A in the Velvet Finishes line for painting the bricks.
http://www.velvetfinishes.com/shop.html

For my last color, I painted Opulent. I covered almost all of the bricks, but not quite. And again, no need for perfect coats or straight edges.
http://www.velvetfinishes.com/shop.html
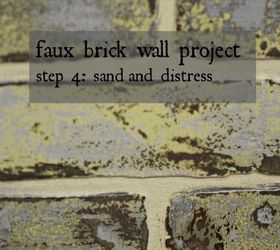
Here's where the real fun begins! The sanding is what makes this project.
I like to use the Ryobi Corner Sander for my furniture projects and it worked great for this as well. Use varying amounts of pressure - from light to really digging deep. By varying the pressure you are varying the color and allowing the layers to show.
To tone down the color contrast, I used the VF Enhance Gel product in the dark brown, Prestigious. I applied the Gel with a lint-free rag. Again, not evenly or perfectly. Easy peasy. When Soulful is sanded it takes on a slightly yellow tone, which I love, but I wanted to tone that down for this project. The Gel added just the right touch. It deepened all the colors and created a warm, rich patina. Note that I only added the Gel to the bricks and did not gel the grout lines.
http://www.velvetfinishes.com/more-cool-stuff.html#!/enhance-gel-prestigious/p/37603232/category=9624024

How do you feel about brick? Do you have any in your home?
I think it would be fun to layer with bright colors also so I'll probably find another spot in the studio and do a bolder color combo too!
Check out my brick wall Pinterest board for more inspiration.
https://www.pinterest.com/ksds/design-focus-walls-brick/

Original article and pictures take http://www.hometalk.com/10109887/diy-making-faux-brick-walls-look-old site
Комментариев нет:
Отправить комментарий